Use This Beginner-Friendly Architecture To Navigate Between Screens In Roku

By Arturo Cuya
Navigation is one of the most important features of our app. It’s the one thing you never think about until it breaks. Unfortunately, most newcomers are not sure what they need to implement to effectively navigate between screens.
If you fall into this bucket, don’t feel too bad about yourself. The official Roku documentation is not great at showcasing example projects outside the complexity of a “Hello World”.
In today’s issue, I will teach you everything you need to know about screen navigation in Roku. From the absolute basics to a complete architecture. My goal is to give you a simple framework to manage screen navigation where concerns are separated in a way that could even be unit-tested if you wanted to.
Let’s get started.
The absolute basics
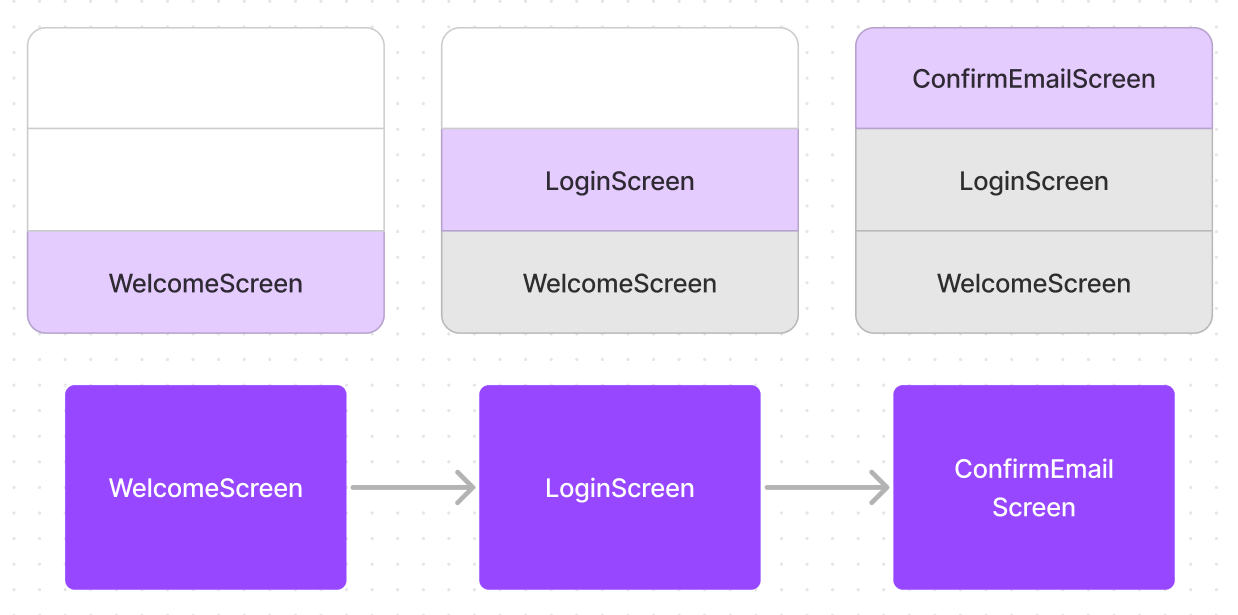
The core of our navigation mechanism is storing the screens in a special data structure called a stack.
In computer science, a stack is an abstract data type that serves as a collection of elements with two main operations:
- Push, which adds an element to the collection
- Pop, which removes the most recently added element.
Stack-based navigation is a technique that allows your app to change screens in a linear manner. That is, when users move forward and backward through a series of screens.

When a new screen is opened, it becomes the “top” of the stack, which means that the user will see it displayed.

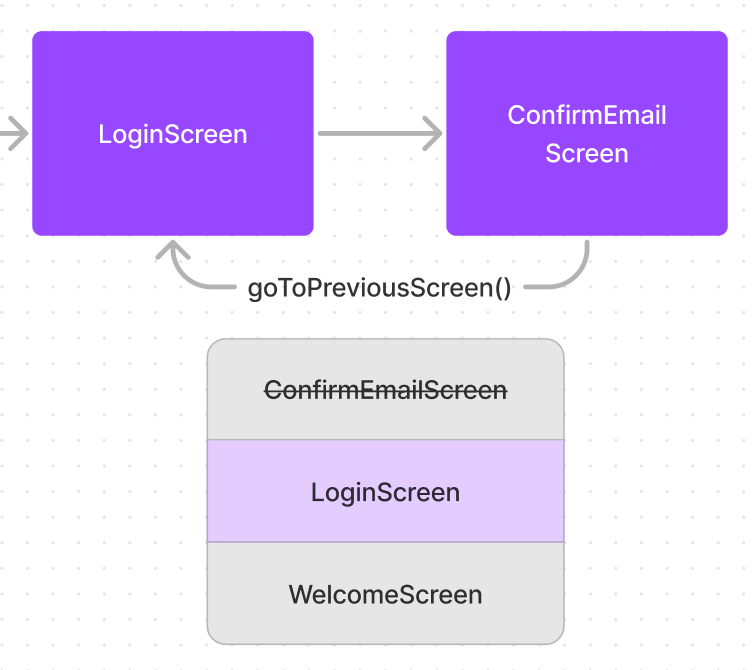
The screens that are below the top of the stack are temporarily hidden. And if the user navigates back, the top screen is removed, revealing the previous screen.

A common use case outside the stack structure — but also tied to screen navigation — is the passing of properties to another screen. These properties usually contain contextual information that was initially private to the current screen but will also be needed by the next screen. This use case is usually known as “passing props” in most front-end platforms.
There are other kinds of navigation mechanisms, like graph-based navigation. But those are better for navigation between elements inside a screen, not between whole views.
The benefits of stack-based navigation come from its simplicity, plus the fact that its learning curve is reduced since most developers who come from other platforms are already familiar with it.
The Beginner-Friendly Stack Navigation Architecture
Our navigation architecture consists of three core components:
-
The
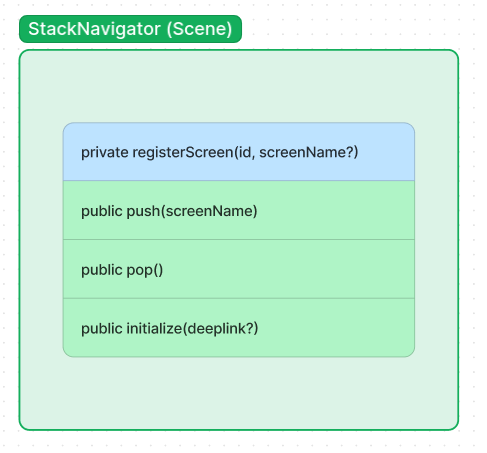
StackNavigator, which contains the stack of screens and is also the main Scene node of the application. This component will take care of the push/pop stack operations. -
The
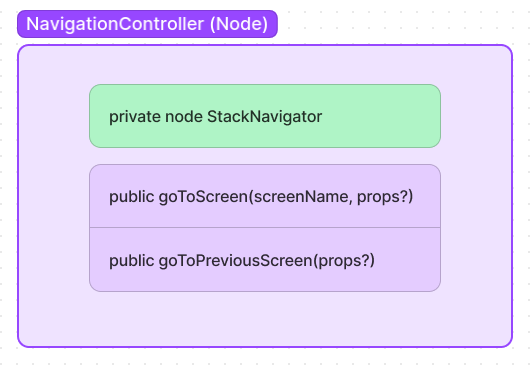
NavigationControlleris a globally available node that any of your screens can call to go to another screen or to the previous screen. It holds a private reference to theStackNavigatorso that your screens don’t have indirect access to other screen references. -
Your regular screens, which will have a globally available reference to the
NavigationController, and will need to implement methods to handle what should be done when they are visited or left.
Here’s a visual summary of this architecture:

Implementing the Stack Navigator
This component will take care of manipulating the screen stack and registering the available screens in your application. It’s also the root of the node tree, so it will hold all your screens as children.

The first method you should implement for the StackNavigator is the registerScreen(id, name?) method. Since the StackNavigator extends from Scene, it means that it will hold all your screens as children, so we’ll need their explicit IDs to reference them later.
I’ve found that having a mapping of screen names and IDs is helpful for when you replace a screen with a completely new implementation, or when you’re A/B testing different screens. This allows you to refer to a screen with the same “name” without explicitly deciding the underlying implementation.
sub init()
	m.screenMap = {}
	m.screenStack = []
end sub

' Usage: registerScreen("SettingsViewForAuthUser", "Settings")
sub registerScreen(id as string, name = invalid as dynamic)
	if (name = invalid)
		name = id
	end if

	' Create the screen from the id as a child
	' of the StackNavigator
	screen = m.top.CreateChild(id)
	screen.visible = false
	screen.id = id

	m.screenMap[name] = id
end sub
But maybe you don’t need this, so the name can be the same as the ID, and that’s why the name argument is optional.
Then, of course, you’ll need to implement the push() and pop() methods. Nothing too fancy here, just use the existing ifArray methods for push() and pop(). Remember that at the end of each operation the top screen of the stack should be visible and all other screens should be hidden.
You can use the ifArray method peek() to look at the top of the stack. That’s the screen you should hide before starting a push or pop operation. This is also a good moment to pass props to your next or previous screen, if any.
function pushScreen(name as string, props = invalid as dynamic) as boolean
    currentScreen = m.screenStack.peek()

    ' Avoid pushing the same screen twice
    if (currentScreen = name)
        return false
    end if

    ' Hide the current screen
    if (currentScreen <> invalid)
        m.top.findNode(m.screenMap[currentScreen]).visible = false
    end if

    ' This assumes that all the screens in the map are children of the main scene.
    screenNode = m.top.findNode(m.screenMap[name])

    if (props <> invalid)
        screenNode.callFunc("setProps", props)
    end if

    screenNode.visible = true
    screenNode.setFocus(true)

    m.screenStack.push(name)

    return true
end function

function popScreen(prevScreenProps = invalid as dynamic) as boolean
    if (m.screenStack.count() = 0)
        return false
    end if

    removedScreenName = m.screenStack.pop()
    removedScreenId = m.screenMap[removedScreenName]

    ' Hide the removed element
    m.top.findNode(removedScreenId).visible = false

    ' Show the next screen in the stack
    nextScreenName = m.screenStack.peek()
    nextScreenNode = m.top.findNode(m.screenMap[nextScreenName])

    if (prevScreenProps <> invalid)
        nextScreenNode.callFunc("setProps", prevScreenProps)
    end if

    nextScreenNode.visible = true
    nextScreenNode.setFocus(true)

    return true
end function
Finally, you want to have an initialize() method that registers all your screens and decides what the first screen should be, maybe changing that decision if the app was opened through a deeplink.
Note: The
idof your screen should be the same as the componentnamefield in your screen’s XML.
sub initialize(deeplink = invalid as dynamic)
	registerScreen("YourScreenId", "YourScreen")
	registerScreen("AnotherScreen")
	' register all your screens

	if (deeplink = invalid)
		' default first screen
		push("YourScreen")
	else
		' decide on another screen based on the deeplink
		push("AnotherScreen")
	end if
end sub
You can pass the deeplink argument to initialize() after creating and showing the scene in main.brs
sub main(args)
	stackNavigator = screen.CreateScene("StackNavigator")
	stackNavigator.show()

	' Pass the contentId deeplink, if any
	stackNavigator.callFunc("initialize", args.contentId)
end sub
The methods pushScreen(), popScreen(), and initialize() must be public, so don’t forget to add them to the StackNavigator's interface:
<component name="StackNavigator" extends="Scene">
    <script type="text/brightscript" uri="StackNavigator.brs" />
    <interface>
        <function name="pushScreen" />
        <function name="popScreen" />
        <function name="initialize" />
    </interface>
</component>
Implementing the Navigation Controller
We don’t want any of our screens to have access to any other screen reference. To avoid that, the screens must not access our StackNavigator directly, since it has all of our screens as children references. So, the purpose of the NavigationController is to be a thin wrapper around the StackNavigator, with the following methods:

function goToScreen(screenName as string, props = invalid as dynamic) as boolean
    if (m.stackNavigator = invalid)
        return false
    end if

    return m.stackNavigator.callFunc("pushScreen", screenName, props)
end function

function goToPreviousScreen(prevScreenProps = invalid as dynamic) as boolean
    if (m.stackNavigator = invalid)
        return false
    end if

    return m.stackNavigator.callFunc("popScreen", prevScreenProps)
end function
As you can see, the m.stackNavigator is a private node-scoped variable inside NavigationController, meaning it can’t be accessed from the outside. We’ll need a method to first initialize it:
sub setStackNavigatorReference(ref as object)
    if (m.stackNavigator <> invalid)
        return
    end if

    ' Check that the passed reference is a StackNavigation node
    if (getInterface(ref, "ifSGNodeField") = invalid or ref.subtype() <> "StackNavigator")
        throw "Error: setStackNavigatorReference() requires a StackNavigator node"
    end if

    m.stackNavigator = ref
end sub
This method can be called immediately after creating the StackNavigator in main.brs:
sub main()
    stackNavigator = screen.CreateScene("StackNavigator")
    screen.show()

    stackNavigator.callFunc("initialize", args.contentId)

	' Make the NavigationController globally available
    m.global.addFields({
        navigation: CreateObject("roSGNode", "NavigationController")
    })

	m.global.navigation.callFunc("setStackNavigatorReference", stackNavigator)
end sub
The usage of the NavigationController would be like this:
sub goToNextScreen()
	m.global.navigation.callFunc("goToScreen", "AnotherScreen")
end sub

sub handlePressBack()
	m.global.navigation.callFunc("goToPreviousScreen")
end sub
Wrapping up
With the NavigationController in place, you might want to add a new public method to all your screens called setProps, to handle when the StackNavigation passes props to your screen.
sub setProps(props as object)
	m.props = props
	doCalculation(props.value)
end sub
Also, given that your screens become visible when reached and hidden when left, observing when the visible field changes is a good indicator for when to clean up any observers or timers you don’t want running while the screen is hidden. This is important since observers are retained in memory until they are unobserved.
sub init()
	m.top.observeField("visible", "handleVisibleChange")
end sub

sub handleVisibleChange()
	if (m.top.visible)
		m.myButton.observeFieldScoped("buttonSelected", "handleButton")
		m.myTimer.observeFieldScoped("fire", "handleRecurrentTimer")
		m.myTimer.control = "start"
	else
		m.myButton.unobserveFieldScoped("buttonSelected")
		m.myTimer.unobserveFieldScoped("fire")
		m.myTimer.control = "stop"
	end if
end sub
That’s it! Now you can go to any screen using
m.global.navigation.callFunc("goToScreen", "AnotherScreen")And return to the previous one with:
m.global.navigation.callfunc("goToPreviousScreen")In Summary
- Store screens in a stack to manage navigation.
- Use
StackNavigatorfor managing the screen stack. - Utilize
NavigationControllerfor screen transition without direct screen reference access. - Implement
setPropsand visibility change handlers in screens for dynamic content and resource management.
Looking for a full code sample?
If you’re already subscribed to the Newsletter, you got the full code sample in the same section of the email you received.
Subscribe using this form, and we’ll send you a full code example with the architecture implemented, plus some usage examples.
Every week I’ll send you cutting edge advice and actionable tips about modern Roku development. State-of-the-art knowledge that you won’t find anywhere else — For free.
Some other ways I can help you:
1. Course: A Modern Introduction to Roku Development
For absolute beginners, this course is meant to set you in the right path to make use of modern tools and best practices from day one. Learn more.
2. Open Source tools to boost your productivity:
Use these tools to 10x your workflows. Free and open source forever.
- create-roku-app: A CLI tool to quickly scaffold Roku apps using the best practices.
- SceneGraph Flex: A flexbox component for Roku Scenegraph applications.
- Roku Animate: Define complex Roku Scenegraph animations in one line of code.
